When shit hits the fan
So I was recently on a Digital Forensics assignment for a customer, where I had to collect evidence from the suspects laptop. I had to brush the dust of my DFIR-skills, as these types of assignments are too common for us.
For this case I quickly looked at what we had in our Go-Bag, and I noticed that we were met with two hardware writer blockers from wiebetech. Cool we got everything we need to capture our image, didn’t we?
Unfortunately no, because we found out, that the laptop we were working with was a an old dusty Lenovo Thinkpad X1 series, with a NVMe SSD inside its belly, which we didn’t have a adapter for! How were we supposed to do this acquisition now, without ruining the evidence. Well, we had a few options, and the first was to find this adapter in our local hardware store - unfortunately apparently every store was sold out of this particular adapter, so we had to opt for other options.
I reached out to my good friend, Lars Bloomgaard, whom is a former Digital investigator for the Danish Police. He told me that we should go for a image acquisition with a software writeblocker instead, with a Linux distro called Caine(Computer Aided INvestigative Environment). The cool thing about this distro is, that everything is mounted as read-only as default, which means that if we boot the confiscated laptop with Caine as boot media, we would be able to collect our image without tampering with the disks inside the laptop. Caine actually has an option to run the distro in RAM of the selected pc, which is pretty cool if you are running low on USB-outputs. Caine is running as a live USB, so you would have to create a USB as a boot media with Caine ontop.
 image is taken from: https://www.caine-live.net/
However, I highly recommend researching what the BIOS option for the PC is, before you try to boot Caine, as you could accidentally boot into the OS of the machine, which would tamper with evidence. For this laptop F1 would get me into the BIOS settings, where I could choose the boot media to be my Caine USB.
When you are in Caine, and ready to run your image acquisition, you simply GUYMAGER and choose which disk to take an image from, and them where to put the image. Here I suggest you put it on a fast external SSD with plenty of storage to speed up the process. BUT before doing the acquisition, make sure that you made the external SSD writeable, as I told you earlier, everything in Caine is mounted as read-only by default.
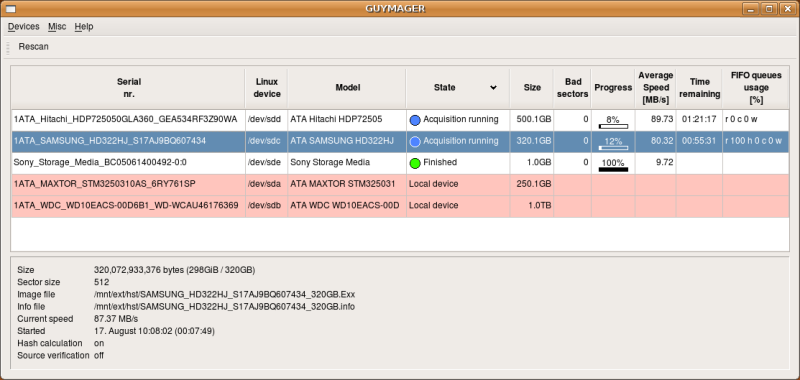
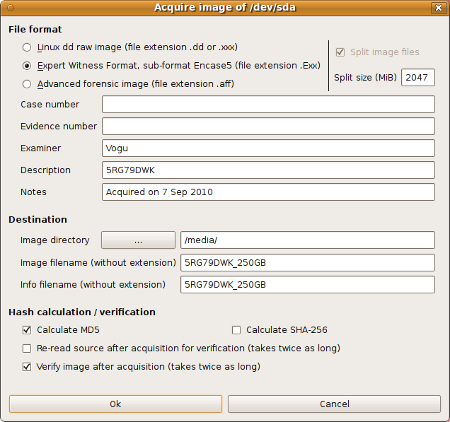 image is taken from: https://guymager.sourceforge.io/
The cool thing about GUYMAGER is that when you are in the acquire image dialog, you can put evidence number, case number and other cool descriptions that will be appended to the image when its finished. It is super beneficial to but the examiner, as you would be able to go back, and see who actually aquired the image.
GUYMAGER also lets you choose different file formats depending on which examiner tool you are using. I’m using Autopsy, so I choosed “Expert Witness Format”.
When you have started your image acuquiring with Caine, it’s time to open a beer, and relax while you wait. No i’m of course kidding, you have tons of other things you can prepare for the case! Get back to work!